Introduce - LabView
Welcome to ME295 and Labview!
Labview, which stands for Laboratory Virtual Instrumentation, is a graphical programming
language designed for engineers and scientists. The hallmark of Labview is that it allows you to create programs with graphics instead of text code. This makes Labview different from traditional programming languages like C, C++ or Java which are programmed with lines of textual commands. However, Labview performs many of the same functions requiring less time and programming experience than traditional programming languages. Of course, prior experience with programming is extremely useful.
Examples of what Labview can do include:
- Monitoring and controlling temperature limits in controlled temperature environments
- Analyzing and processing electric signals
- Monitoring and controlling water levels
- Vibration analysis
- Evaluating stress and strain
Labview's graphical programming language is called "G" which utilizes graphics that look like real instruments for the program inputs and outputs and icons (nodes) that are wired together to perform the program functions. Labview is almost totally portable across the Windows, UNIX and Macintosh platforms.
 |
An actual Labview program that you create is called a "VI" which is short for virtual instruments. These programs are ideal for experimental lab simulations because the virtual instruments actually imitate real-world instruments. Replacing actual instruments with virtual instruments also gives users more flexibility and reduced project cost because they don't have to purchase expensive laboratory hardware to perform their work. As you will see, Labview can simulate controls like sliders and dials, many types of switches, and indicators like LED's, thermometers and waveform graphs on its virtual workbench. Users can even create sub-VI's which are like sub-routines in regular programming. This makes modular and hierarchical programming very easy. |
Labview is designed to take input data directly from the user through its virtual-instrument interface or from measurements of real-world phenomenon (Data Acquisition). Data inputted from real-world phenomena usually requires Data Acquisition (DAQ) hardware. This hardware takes analog voltages or digital data input from transducers (sensors) and directly inputs it into a Labview VI. Examples of measured phenomenon are: temperature, flow, speed/acceleration, pressure, light intensity. Examples of transducers include thermometers, flow meters, accelerometers, strain gauges, etc.
Once Labview has the data, it then analyzes/processes the data and outputs and/or displays the results. Labview program output data can be saved to a file, displayed on the virtual-instrument interface, or can be used to drive controls that influence the external environment.
Labview has two main parts which appear as the two major windows:
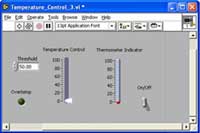
- The Front Panel is a window where you create your virtual instruments. Typically, this is where
the user interacts with the program by entering data and viewing results. It is called the Front Panel because it is supposed to look like the front panel of an instrument or a group of instruments. The Front Panel virtual instruments generally come in two forms: user inputs called controls and the program outputs called indicators. Again, data is generally inputted to a VI program through a control and processed data is output by a display on one or more indicators.
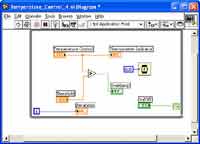
- The Block Diagram is a window where the graphical code is created. This is the
"programming" that replaces text syntax in traditional programming languages. What you see in this window are icons called nodes. There are many types of nodes. First are the nodes that represent the controls and indicators on the Front Panel. These are called terminals. In addition, the Block Diagram includes nodes that represent functions (like add, subtract, compare, constants to name a few), and program execution structures (like while loops, for loops and case and sequence structures). Most nodes are wired together for logical functioning of the program. All nodes have one or more input and/or output terminals called connectors to wire to and from.
Labview utilizes what is called data flow which is where a node executes its function only after it has received data from a previous node. After the node is through with its function, the processed data is transferred via the wire to the next node. There are several different types of data and wire types to carry the data. Finally, there are debugging and troubleshooting tools to help you when your VI doesn't work. We will elaborate on these issues later.
Below is a table comparing Labview's G programming terms with conventional programming terms.
Labview "G" Programming Terms Compared to Their Conventional Equivalents
| Labview |
Conventional Programming |
| VI |
Program |
| "G" |
C, C++, Java, Pascal, BASIC, etc. |
| Function |
Function or Method |
| Front Panel |
User Interface |
| Block Diagram |
Program Code |
| Sub VI |
Subroutine, Subprogram |
In this class, you will apply Labview in a very special way. You will create a Labview virtual machine that operates on a client/server network. Labview virtual machines can communicate with each other over a network or even the internet. You will input all constant and variable information into your virtual machine and it will then communicate with the other virtual machines over a network or the internet to solve the required tasks and simulate the results. Labview virtual machines created in prior ME295 classes have been used to solve and simulate engineering problems like stress and strain, beam deformation, and dynamic movement of components due to pressure loads.
This Introductory module to LabVIEW will cover:
-
Virtual Instruments
-
-
- Run
- Continuous Run
- Stopping a VI and Abort
- A Broken Run Button
|